Loading Custom Data
There are multiple ways you can load data into Permit, and we will cover all of them below.
Via a user in the UI
When navigating to the user interface, you have the option to edit the user attributes for each unique user. These attributes are then sent to the Permit backend and stored by with the user record in our database.
As you perform a permit.check() for any individual user to check his access, these attributes are dynamically loaded into the
function and the enforcement is evaluated based on the policy and the user attributes.
Via the permit.check() function
As a permit.check() is called, it checks and verifies the actions a user might have on a particular resource. The three parameters
you need to pass into the function are the unique user id, action and resource. As part of the function, rather than passing
in the user id and resource, you can pass in a whole object that will contain the user or resource attributes.
These attributes are evaluated on each enforcement check. This also gives you the flexibility to pass in dynamic / just-in-time attributes and evaluate these against the policies.
Both a resource and a user can have multiple attributes attached to them. There are no practical limits on number of objects or object sizes. There are limits on the overall data volume that can be loaded to a single PDP, which can be bypassed via PDP Sharding.
Here is an example of the code:
const permitted = await permit.check(
    {
        key: "john@smith.com",
        attributes: {
            location: "England",
            department: "Engineering",
        },
    },
    "read",
    {
        type: "file",
        attributes: {
            isPaying: "true",
        },
    }
);
Via the API
Permit provides an elegantly crafted API editor designed to streamline the structuring of your policies, facilitate seamless audits, and effectively manage team members, among other functions. Notably, the entire no-code user interface operates on a fully API-driven backbone, allowing for the seamless automation of any action within the system.
You can find the whole redoc referencing all the API functionality here.
In general, you can define attributes for individual users, or individual resources. You can follow the API call to define user attributes and resource attributes.
Via OPAL
With the new Scope Config API, you can set your own data sources when setting up your GitOps policy. This means you can easily mix the simplicity of Permit.io with OPAL's ability to be tailored to your needs.
To make changes to the OPAL Scope, use the OPAL Scope API. You'll just need to include the project and environment IDs in the API endpoint URL - don't worry, our guide can show you where to find them.
Out of the box, Permit automatically pulls in details about users, roles, and more from its cloud database to OPA, setting a solid foundation for your policy. But with this API, you can add even more data sources to build a policy that's just right for you.
For instance, in this guide, we'll show you how to add information from around the world using data from https://restcountries.com.
Set custom data sources using the API
curl --location --request PUT '[https://api.permit.io/v2/projects/{project_id}/{env_id}/opal_scope](https://api.permit.io/v2/projects/%7Bproject_id%7D/%7Benv_id%7D/opal_scope)' \

--header 'Content-Type: application/json' \

--header 'Accept: application/json' \

--header 'Authorization: Bearer permit_key_***' \

--data '{

     "data": {

          "entries": [

               {

                    "url": "<https://restcountries.com/v3.1/all>",

                    "dst_path": "/countries",

                    "config": {

                         "headers": {

                              "Accept": "application/json"

                         }

                    }

               }

          ]

     }


}'
In order to see the new data, you can request the data path from your local PDP.
curl --location --request GET '<http://localhost:8181/v1/data>' \
--header 'Authorization: Bearer permit*key* {{secret}}'
API Docs for Scope Request (API still in beta):
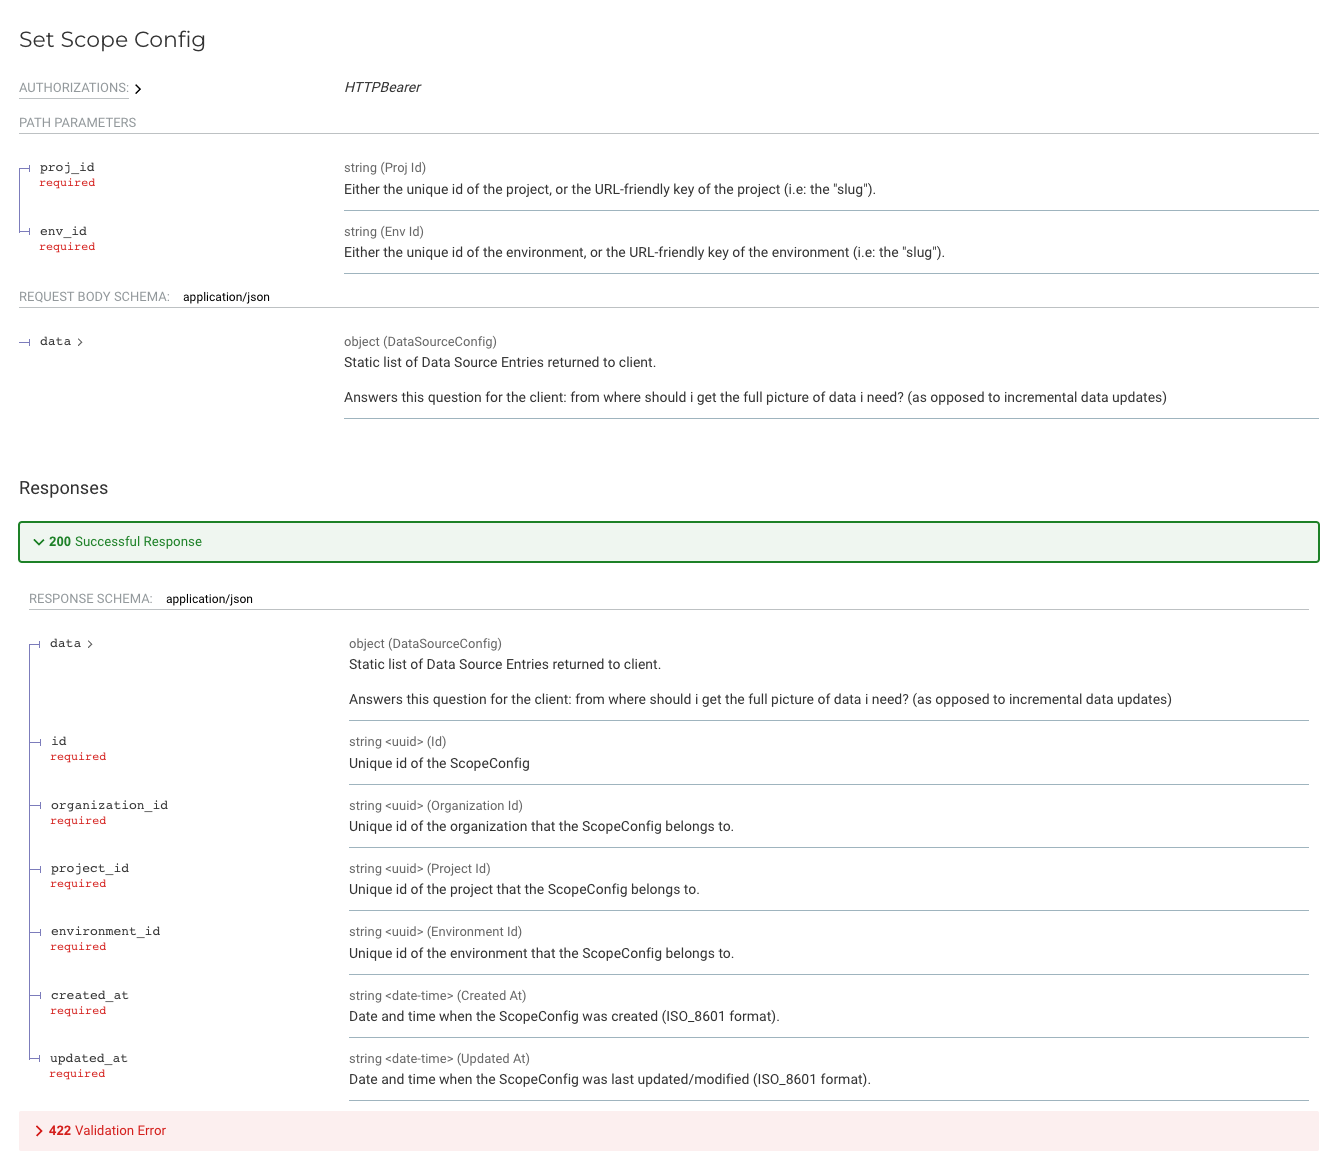
You can view the full OPAL Scope documentation here.
Custom scopes are supported from PDP v0.2.15
Make sure you have pulled the latest PDP container.
docker pull permitio/pdp-v2:latest
Make sure you have enabled the OPAL_SPLIT_ROOT_DATA flag when running the container.
OPAL_SPLIT_ROOT_DATA=1
For example, if you are running it with docker, it will look like the example below:
docker run -e PDP_API_KEY=<YOUR-PERMIT-API-KEY> -e OPAL_SPLIT_ROOT_DATA=1 permitio/pdp-v2:latest
If the GitOps feature is activated in your account, you can enhance your Rego policies by integrating data from the custom data source as illustrated below:
data.countries[0].capital == "Bridgetown"